
Planning Your Straw Bale Homestead
Determining Your Goals
So, let’s kick things off with some good old-fashioned planning. Before you even think about straw bales, take a moment to sit down and think about what you want from your homestead. Are you aiming for a cozy getaway or a full-time dwelling? Your goals will determine not just your design but also the materials you’ll need.
Personally, I found it helpful to write down my dreams. Visualize your ideal space! Trust me, the clearer you are about your vision, the smoother this whole process will be. And don’t forget to consider any local regulations or codes – sometimes they can throw a wrench in your plans, so better to know beforehand!
Another aspect to think about is sustainability. Are you going to live off the grid, or stay connected to the urban conveniences? This choice impacts not only your layout but also your material sourcing. The beauty of a straw bale home is its flexibility to meet both needs.

Choosing a Site
Now that you’ve got your vision in mind, let’s talk about finding the right piece of land. Choosing the location for your homestead is like dating – you’ve got to find the one that’s a perfect fit! Look for land with good drainage and plenty of sunshine. Trust me; a sunny location can make all the difference when it comes to heating your home naturally.
Accessibility matters too. Ensure that your land can be reached by a vehicle, or you might find yourself hauling bales by hand, which, spoiler alert, can be a workout! Take time to visit potential plots during different times of day. It’s essential to see how sunlight and shadows change around the land.
Soil quality is another aspect that you won’t want to overlook. If you’re planning on growing your own supplies, check for good soil; it’ll save you tons of effort down the line. You may want to run some basic tests to see what you’re working with, particularly if you’re eyeing a plot that looks a bit neglected.
Gathering Materials
Where to Find Straw Bales
Now that your head’s swimming with ideas and possibilities, it’s time to gather materials! Straw bales are one of the main components of this type of structure and the good news is, they’re fairly easy to source. You might find them from local farms or agricultural suppliers. Just make sure they’re clean and dry. Don’t be afraid to ask around; farmers usually love to chat and can lead you to a good deal!
Another option is to look online. There are all sorts of farmer networks and marketplaces popping up these days where you can locate straw bales nearby. I found a great seller just by searching on social media! How’s that for modern solutions?
Be sure to take into account how much you’ll need. It varies based on your design, but I recommend buying a little more than you think you’ll need. Having extras can save you from a last-minute panic—trust me, you don’t want to find yourself scraping for bales when you’re knee-deep in construction!
Other Essential Materials
Besides straw bales, you’ll need some supporting materials. Wood for framing is vital, and you can often use reclaimed wood for this. It’s a sustainable option and adds character to your home—who doesn’t love a little personality?
Don’t forget about the plaster! You’ll need materials for both the interior and exterior finishes. I opted for lime plaster because it breathes well and helps regulate humidity, which is super important in a straw bale structure.
Lastly, think insulation. Depending on your climate, you might need additional materials to keep your home cozy. Look into natural options like wool or recycled denim for a truly green build. Those small touches can make all the difference in how comfortable your home feels!
Building the Structure
Laying the Foundation
Alright, here comes the fun part—building! First things first: you’ll need a solid foundation. I went for a concrete slab, but you can also use a pier foundation. The foundation is crucial because it prevents moisture from wicking up into your bales, which can lead to all sorts of problems.
Be sure to line out your space accurately before pouring concrete or setting down blocks. I can’t stress enough how important it is to double-check your measurements. Once the foundation is set, everything else will flow a whole lot smoother.
While you’re at it, think about drainage! Ensure that your foundation has a slight slope to avoid water pooling near your home. I learned this the hard way, so trust me—it’s a much easier process to plan ahead than to fix after the fact!
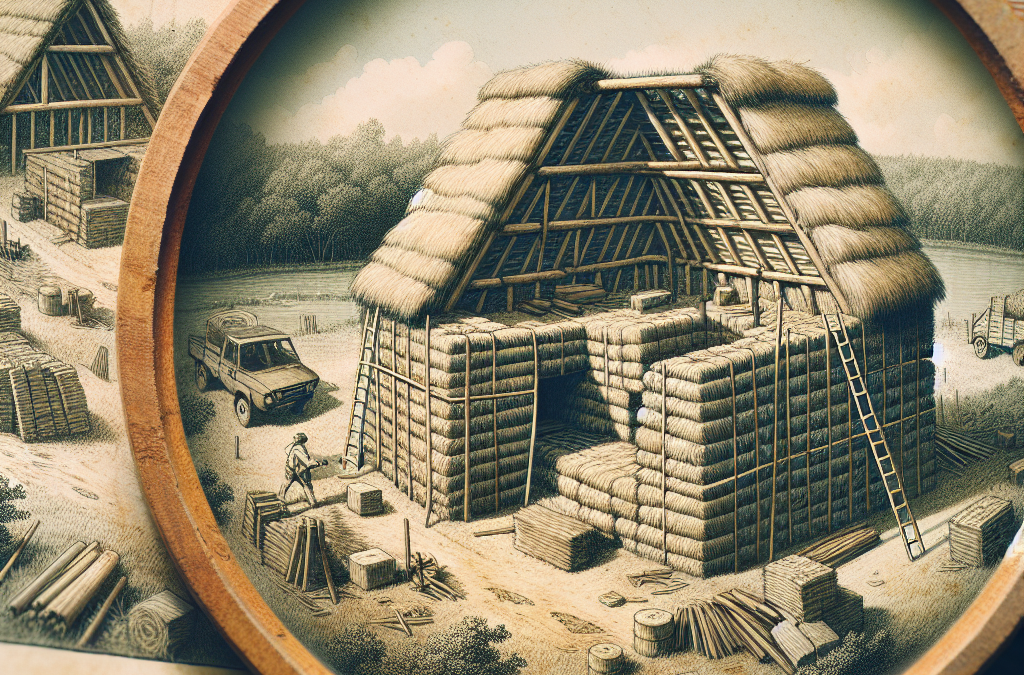
Stacking Bales and Framing
With your foundation ready, you can start stacking those bales! I suggest working in a team if you can—bales aren’t exactly lightweight. Start from the corners and go up, making sure to stagger the joints like you would with bricks. It gives the structure added strength, oh, and it looks way cooler too!
As you stack, check every row for levelness. You want a solid, straight wall; wobbly walls are no fun when you start adding weight. I would often stop and step back to admire my work. It helps to gauge how things are coming along and make any adjustments!
Once you have the bales stacked, it’s time to frame your windows and doors. This involves cutting out the openings and making sure they’re all snug and secure. Using wood for the frame adds both structure and aesthetic appeal, giving the home that rustic, hand-built charm.
Finishing Your Homestead
Applying Plaster
As we near the finish line, it’s time to put on the plaster. This is where your vision really comes to life! Applying plaster to your straw bales not only protects them but also adds insulation and finishes the look. I’ll tell you, getting the right mix is key—I found that experimenting a bit before diving in worked wonders!
Make sure the straw is moist before you apply the first coat. It helps with adhesion and prevents cracking as it dries. I preferred using lime plaster, which dries beautifully and allows the walls to breathe, keeping my homestead comfortable year-round.
Don’t rush this part—take your time to apply even coats. Sometimes I would throw on music and just get lost in the work. The rhythm can make the plastering process more enjoyable, turning what could be tedious into a personal ritual.
Interior Design and Landscaping
With your straw bale structure standing strong, it’s time to let your creativity shine! For the interior, I recommend sticking with natural materials for floors and fixtures. Bamboo flooring or reclaimed wood can add warmth to your space. Also, don’t forget about lighting; the right lights can completely transform the feel of the room.
Landscaping is just as important! I chose to plant native plants around my homestead as they require less water and attract local wildlife. Creating a space that connects your home with its natural surroundings is rewarding. I even started a little garden nook, and watching things grow has been incredibly fulfilling!
Lastly, think about outdoor living space. Porches or decks can create an inviting atmosphere for relaxing and entertaining. Adding a little furniture—perhaps some upcycled chairs—can enhance your space and make it feel cozy and lived-in.
FAQ
1. How long does it take to build a straw bale homestead?
The time it takes can vary widely depending on your experience and how much help you have. Generally, it can take anywhere from a few months to over a year, especially if you’re doing it part-time while juggling other commitments.
2. Are straw bale homes energy efficient?
Absolutely! Straw bales provide excellent insulation, keeping your home warm in the winter and cool in the summer. This leads to significant energy savings over time, especially if you use natural materials for your finishes.
3. What maintenance do straw bale homes need?
Like any home, straw bale structures require maintenance, but it’s largely about keeping the exteriors weather-tight. Regularly inspect your plaster and make repairs as necessary. Also, watch for any signs of moisture or pests.
4. Can I use straw bales for something other than walls?
Definitely! Straw bales can also be used for outdoor seating, raised garden beds, and temporary structures. Their versatility is one of the reasons I fell in love with them!
5. Do I need a permit to build a straw bale home?
This often depends on local building codes. It’s best to check with your local building department before starting, as requirements can vary based on where you live.


