
Hey there, fellow homesteaders! Today, I want to share my personal journey of creating a DIY smoker to preserve our homestead meats. It’s been a game-changer for our food storage and has added a delightful smoky flavor that’s hard to beat. Let’s dive into the key components that will guide you in crafting your very own smoker!
Choosing the Right Materials
Understanding the Basics
First things first, you gotta decide what materials to use for constructing your smoker. I found that the best results came from using wood, metal, and some durable insulation. You want something that can hold up against the test of time and heat, right? Oak, hickory, or cherrywood can really add that smokey note to your meat, so think about what flavors you enjoy.
You’ll also want to consider the smoker’s size. Are you planning on smoking small batches or large quantities? The space will influence your design choices. I went with a medium size to keep things versatile – big enough for family gatherings, but not too cumbersome to handle.
Don’t forget to check local regulations regarding building materials! Sometimes there are rules about what’s safe and what’s not for food preservation. A little research can save you headaches down the lane!
Gathering Tools
Now, let’s talk tools! You don’t need a fancy set of equipment to get things rolling. A simple toolkit with a saw, drill, and measuring tape will typically do the trick. I also recommend a sturdy pair of gloves for safety – smokin’ meat can get a bit hot under the collar!
Once I had all my tools in hand, I felt ready to dive into the project. Not to mention, having the right tools makes everything easier! Trust me; you’ll appreciate this step when you’re in the thick of it.
One might think you need high-tech gadgets, but honestly, much of the magic lies in your technique rather than the tools. Go with what you’re comfortable with, and don’t hesitate to ask a neighbor for help if you need it!
Designing Your Smoker
Next up, let’s brainstorm how to design your smoker. I started with a simple blueprint to sketch out the basic structure. The design can be as modest or fancy as you want, but I aimed for functionality – something that would work well without breaking the bank.
I recommend considering airflow, which is vital for smoking meats evenly. A good design allows smoke to circulate while still keeping the heat in. I added adjustable vents which I found super handy as a way to control temperature while smoking.
Lastly, think about aesthetics too! Smoker doesn’t have to be an eyesore in your backyard. I did my best to match it to my homestead’s charm. A little creativity can go a long way in adding personality to your project!
Assembling Your Smoker
Building the Frame
Ok, let’s get building! I started with the frame, which is the backbone of your smoker. Make sure it’s sturdy and level because this is where all the magic happens. I used screws and metal brackets for reinforcement, ensuring durability.
As I put it together, I cracked open a cold drink and took my time. You don’t want to rush this part! Taking time to ensure every piece fits perfectly was crucial. It would be a bummer if it fell apart halfway through a smoking session, right?
After getting the frame locked in place, I added walls and a solid door. Trust me; a well-fitted door helps hold the smoke and heat in – vital for successful smoking.
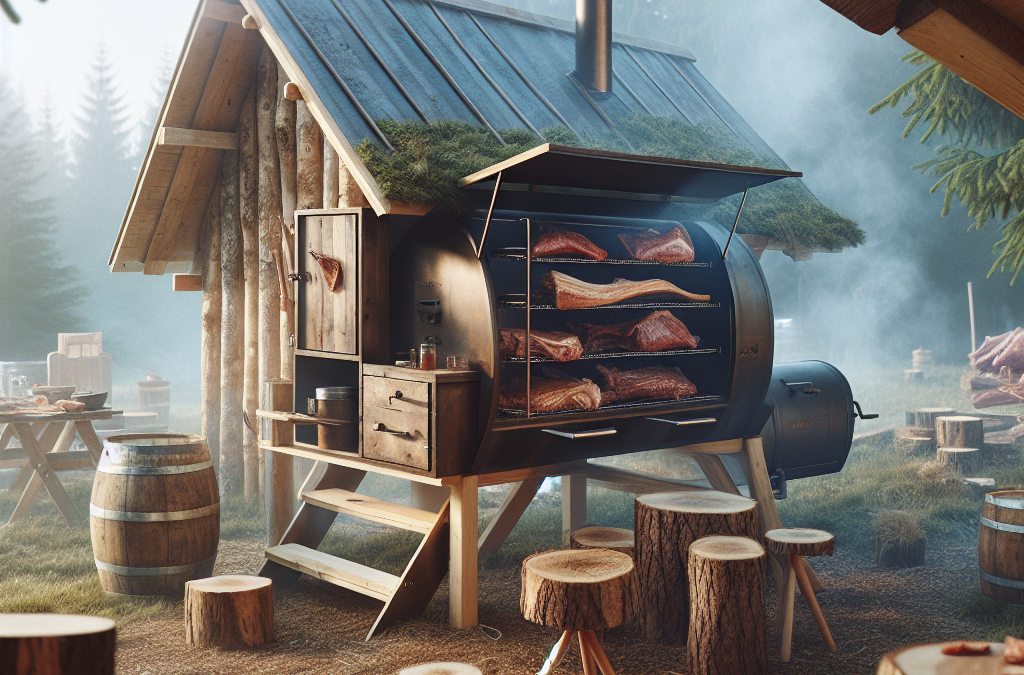
Creating the Smoke Chamber
Next came the smoke chamber! This is where the magic truly occurs. I lined the interior with heat-resistant material to help in maintaining the ideal temperatures when smoking. Additionally, I placed a removable water pan at the bottom to help regulate moisture. Keeping things juicy is key!
While assembling, I took care to ensure there were enough racks for meat. You don’t want overcrowding in the smoker – it can lead to uneven cooking, and nobody wants that! I recommend spacing the racks so air can flow freely around the meat.
In my experience, it’s also wise to build in a thermometer to monitor internal temperature without opening up the door too often. This keeps the heat steady and gives you a sense of how your meats are doing inside. Major win!
Finishing Touches
Now that you’ve got the basics down, it’s time for the finishing touches! Adding some insulation around the smoker can really help with temperature consistency, especially during colder months. I learned this the hard way on my first try!
I also added a little paint job to the exterior. Nothing wild, just something that would blend nicely with the homestead vibe. The last thing you want is for your new piece to clash with your stylish garden!
Finally, add any personal touches that reflect your style. Whether it’s a sign or some decorative elements, make it your own! It enhances your pride when you step back and admire your hard work.
Using Your Smoker
Preparing the Meat
Alright, so your smoker’s ready, and it’s time to start prepping the meat. I always emphasize the importance of seasoning. You can either use a dry rub or a marinade – whichever strikes your fancy. The right seasoning can make all the difference!
I like to let the meat sit for a while after seasoning to really soak in those flavors. Some folks even suggest overnight marinating for a deeper taste, and let’s be honest, it’s worth the wait!
Once prepped, be sure to bring the meat to room temperature before putting it in the smoker. This can help ensure even cooking and that delicious smokey flavor you’re looking for.
Controlling Temperature and Smoke
Controlling temperature may feel a bit tricky at first. I found that keeping an eye on the thermometer made it much more manageable. Fine-tuning the vents can help you regulate airflow and heat. If the fire starts burning too hot, I adjust the vents to cool it down.
When it comes to the smoking process itself, remember that patience is key. A slower cook usually yields the best results. I typically smoke my meats for several hours, depending on the type. Keep a notebook to track timing and adjust based on your past experiences!
Smoky flavor is something I have always loved. To enhance that, experiment with different wood chips. Each wood adds its unique touch. I’ve tried everything from mesquite to applewood, and each batch tends to surprise me in a good way!
Storing the Smoked Meats
Once your meats are done, you’ve got to store them properly. After they’ve cooled, I usually place them in airtight bags or vacuum-sealed containers to stay fresh. Depending on the kind of meat, the shelf life can vary significantly, so be sure to do a little homework!
It’s often tempting to dive right in and enjoy your delicious creation, but taking proper storage steps can make a big difference in long-term quality and flavor. Who doesn’t want to munch on some tasty, preserved goodness later down the line?
Lastly, always label your stored meats with the date and type. You’ll thank yourself later when you’re rummaging through the freezer looking for last week’s smoked brisket!
Conclusion
So there you have it, folks! Building a DIY smoker for preserving all that delicious homestead meat is not only practical but super fun. I’ve learned so much through this process, and I hope sharing these tips makes your journey a touch easier. Nothing beats the satisfaction of savoring your hard work and sharing it with loved ones.
FAQ
1. What type of wood is best for smoking meats?
The best woods for smoking meats are typically fruitwoods like apple or cherry, as well as oak and hickory for a bolder flavor. It often depends on what taste you’re aiming for!
2. How long should I smoke my meats?
The smoking time can vary widely based on the type and size of the meat. Generally, it can range from a few hours to an entire day, so always keep an eye on your thermometer!
3. Can I use my smoker in winter?
Absolutely! Just ensure your smoker is well-insulated and be prepared to monitor the temperature more closely, as colder temperatures can affect cooking times.
4. Should I brine my meat before smoking?
Brining can enhance flavor and moisture, so it’s definitely worth trying! It adds an extra layer of juiciness to your smoked meats.
5. What’s the best way to clean my smoker after use?
After each use, let your smoker cool down and then scrape off food residue with a grill brush. Seasoning the interior with oil can help prevent rust and ensure good flavor for future smoking!


