
Understanding Biochar
What is Biochar?
So let me tell you about biochar – it’s this supercool form of charcoal created from organic materials. Imagine turning your kitchen scraps and yard waste into something mighty that improves soil health! Biochar is produced through pyrolysis, which means heating organic stuff in low-oxygen environments. It might sound complicated, but it’s pretty straightforward and so rewarding.
Why is biochar such a big deal? Well, besides being eco-friendly, it helps retain moisture in the soil and improves nutrient retention. For us gardeners, it’s like adding a secret weapon to our gardening arsenal. Seriously, it’s a game-changer for your plants and overall garden success.
Biochar can also aid in carbon sequestration, which is a fancy way of saying it helps capture carbon dioxide from the atmosphere. So, yes, making and using biochar not only benefits your garden but also the planet. What’s not to love about that?
Making Biochar
Gather Your Materials
Now that we’re hyped about biochar, let’s get to the fun part: making it! First, you need to gather your organic materials. Think branches, leaves, and even kitchen scraps like fruit peels. You can use pretty much anything that’s plant-based!
Once you’ve got your stuff, chop it into smaller pieces. This helps it burn more evenly during the pyrolysis process. I’m talking small enough to fit through a compost bin hole – you want those good, hot coals!
And don’t forget about safety gear. Fire is fun, but we need to play it smart, right? Gloves and goggles should be your besties while you work on this project.
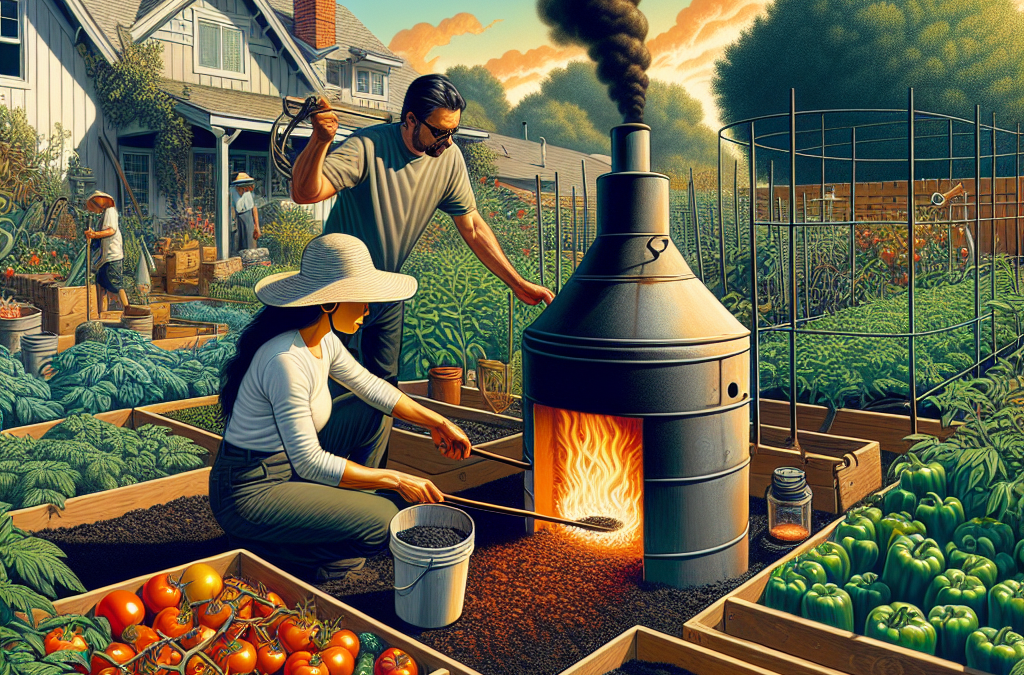
Pit vs. Kiln
When it comes to making biochar, you can go for a simple pit method or invest in a more complex kiln. The pit method is great for beginners. You basically dig a hole, fill it with your organic materials, and light it up. The downside? It can be a bit smoky, and you need to monitor it carefully.
A kiln, on the other hand, can be a bit pricier and requires some effort to set up, but it’s easier to control and produces better-quality biochar without all that smoke. I’ve tried both methods, and while the pit is simpler, I’m leaning towards the kiln for those smoke-free vibes.
If you’re super serious about this process, consider watching a couple of tutorial videos online. There are tons out there from folks just like us who have nailed the art of biochar-making!
Pirolysis Methodology
Now, this is where the magic truly happens. Once you’ve prepped your materials, it’s time for pyrolysis! If you’re using a pit, light it up and cover it with soil to limit the oxygen. If you’re using a kiln, you’ll want to follow the manufacturer’s instructions.
Timing is essential. You want to let it cook long enough for the materials to turn into charcoal but not too long that you turn it into ash. I usually check on my biochar every couple of hours to get it just right. It’s like cooking a gourmet meal but with woodchips!
Once it’s all done, let it cool completely before handling. And trust me, the smell is amazing! You’ll be tempted to keep your biochar pile as a decorative garden feature, but it’s best used as soil amendment.
Using Biochar in the Garden
Mixing into Soil
Alright, we’ve made our biochar, and now it’s time to use it! One of the simplest ways is to mix it into your soil. I like to apply it right before planting, and mix it in really well. This helps to improve soil texture and creates a haven for beneficial microbes.
You want to aim for about 10-20% biochar mixed with your regular soil. It may feel like you’re adding a lot, but trust me, it’s going to pay off. I’ve seen my plants thriving more than ever with this magical mix!
Some people even recommend activating biochar by mixing it with compost or nutrient-rich tea before applying it to your garden. This ensures your plants get the best co-starring partner possible, which is especially helpful for seedlings.
Topdressing
If mixing it into the soil and planting isn’t your jam, you can use biochar as a topdressing too. Just spread a thin layer over the top of your soil around existing plants. It’s like giving your plants a cozy blanket to snuggle under!
As the rainwater and irrigation hit that layer, the biochar will start to soak up nutrients and moisture, slowly releasing them to the plants’ roots. It’s a double whammy for plant health and soil structure!
Plus, it adds a unique texture to the garden, making everything look slightly fancy and artsy. Who said gardening can’t have a touch of style?
Benefits Recap
Let’s take a minute to recap why using biochar is so beneficial in gardening. First off, it helps retain soil moisture, meaning that you don’t have to water your plants as often. Less watering? Yes, please!
Secondly, biochar improves soil aeration and eliminates toxins in the soil. Your plants will thank you for that. Plus, it attracts beneficial soil microbes that lead to a healthier garden ecosystem.
Finally, using biochar is one of the ultimate eco-friendly gardening practices, and as homesteaders, we love doing our part to help the environment. Plus, it feels so rewarding to use something we made with our own hands!
Tips for Successful Biochar Application
Choosing the Right Time
The timing of when you make and apply biochar is crucial. Ideally, you want to make your biochar in advance of planting seasons. This allows it to break down a bit and mingle with the nutrients in the soil before your plants actually arrive on the scene.
In the fall, I usually make my biochar and let it sit over winter. By spring, it’s ready to roll when I’m planting those new little guys. It’s like your soil gets a spa day before they come to the party!
Remember, soil health is a process. Don’t expect instant results overnight, but over time, you’ll notice a lovely transformation in your garden’s vitality.
Monitoring Soil Health
Once you start using biochar, it’s essential to keep an eye on how your soil is responding. I like to do this both visually and by occasionally testing the soil. Are your plants looking happier? Is the soil retaining moisture better? These are positive signs!
Soil testing kits are pretty straightforward to use. They can help measure pH and nutrient levels to ensure everything’s on point. You’ll see whether your biochar is kicking it in the soil and acting like that all-star player we know it can be.
Adaptations may be needed based on your observations. Maybe you find you need to adjust the biochar ratio a bit. Be flexible and willing to learn as you go – gardening is all about evolving!
Staying Informed
Finally, keep up with the latest gardening trends and tips. There are book clubs, online forums, and social media groups entirely dedicated to biochar and sustainable gardening. Engage with fellow gardeners, share successes, and learn from their experiences.
Staying informed will help you refine your practices and solve any challenges you might encounter while using biochar. Plus, being part of a community can be a ton of fun, and you’ll feel like you’re part of a larger mission!
Always remember, gardening is a journey. And with biochar, it’s a journey that can lead to a healthier garden and planet!
FAQs
1. What types of materials can I use to make biochar?
You can use almost any organic material! This includes branches, leaves, wood chips, and even kitchen scraps like fruit peels. Just make sure they are dry and cut them into smaller pieces.
2. Is making biochar difficult?
Not at all! The process can be broken down into simple steps. You gather materials, choose a method (like a pit or kiln), and then go through pyrolysis. With a bit of patience and care, you’ll get the hang of it!
3. How much biochar should I use in my garden?
A good rule of thumb is to mix in about 10-20% biochar into your soil. If you’re topdressing, keeping the layer thin is best, as you want it to integrate with the soil.
4. Can biochar be used in raised beds?
Absolutely! Biochar works wonders in raised beds, helping to improve soil structure and moisture retention. Just be sure to mix it thoroughly with your garden soil before planting.
5. How long does it take to see benefits from using biochar?
While you might notice some immediate improvements, especially in moisture retention, the real benefits accumulate over time. Think of it as a long-term investment in your soil health and plant vitality!


